| General Info | How to Fish | Where to Fish | What's this Fish | Who's Fishing | ||
| handline fishing | ||||||
|
How to Fish :: Knots & Rigs :: Cable Car RigThe name cable car rig is given to its nature of its hook line sliding along the main line like a cable car. It is popularly used on jetties to target pelagic fishes in Singapore. Common species caught using this rig include Wolf Herring, Mackerels, Queenfish and other fishes that roam in midwater. Cable car rig has a very high freedom of movement of the hook line, using a live baitfish is usually preferred as it is able to swim freely along the main line covering a wider area and keeping it alive longer. However, this rig is susceptible to the effects of current speed and direction which will be covered later in this section. The cable car rig consists mainly of two parts; the hook line to hold the bait and sinker line. They are two separate components that should be made detachable readily, this is because the sinker line is to be casted out first and later attaching the hook line to be slided down into water.
The Hook Line The items you need for overall setup includes a fishing hook, snap swivel, a rubber sleeve, a barrel swivel, and snap. It is extremely important to select the right size and type of swivels in this setup. We want to use a snap swivel that is strong on the snap, it must not open easily under stress especially when it will be subjected to bending when a big fish is on the line. So look for one with a secure locking mechanism. The size the barrel swivel must also be large enough to stop the the snap swivel from passing through it.
Specifications (use default values only if you are unsure)
Tying Procedure We start by snelling the hook on a length of 4 feet leader. Tie the other end of the line with a snap swivel using trilene's knot. Now, you should have your hook line completed.
Sinker Line It is possible to do without a sinker line although it is not advisable to do so in areas that have rocky seabed. The sinker line is there to elevate the mainline from the seabed so that it won't get damaged from any forms of abrasion at the bottom. Again the barrel swivel must be strong and big enough to stop the snap swivel from sliding through. If you have to use a small swivel, you will need to add a plastic bead on the mainline to stop the snap swivel instead. In either case, you will need to use a rubber sleeve to cover the knot at the barrel swivel to prevent the sliding swivel from damaging it.
Specifications (use default values only if you are unsure)
Tying Procedure Cut a piece of 3ft leader and tie a barrel swivel to one end and a snap to the other using trilene knot. Your sinker line is done.
Putting both parts together When using the rig as a whole, you need to attach the sinker line to the main line. First slot a small length(2cm) of rubber sleeve over the main line and tie the mainline to the barrel swivel using trilene knot. If possible, push the rubber sleeve all the way to the swivel such that it covers the knot entirely. Now you can test the rig by attaching the hook line onto the mainline to see if barrel swivel and rubber sleeve is able to effectively stop the sliding swivel.
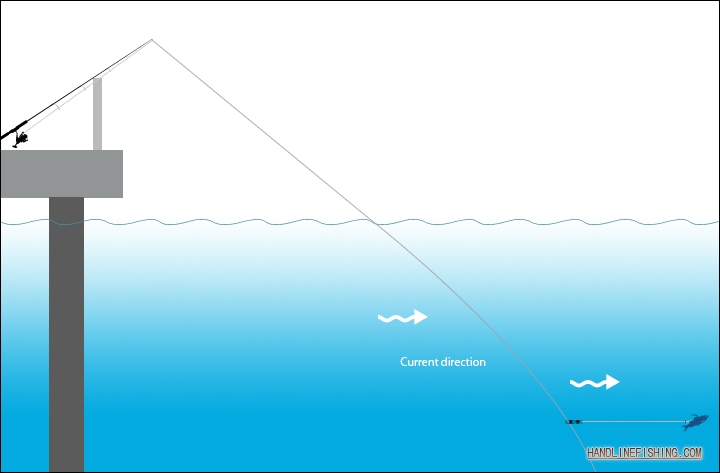
Usage To deploy the cable car rig, we first attach the sinker line(with sinker) to the main line. Cast out at the desired direction and let the sinker reach the bottom, wait for half a minute to let the sinker settle and sit firmly onto the seabed. Reel back some line but make sure the line is not taut. Let the rod tip lay low so you can reach for the line. Then hook the bait and clip the hook line onto the main line and let it slide down. Once the bait touches water, you can raise the rod straight up high to aid the bait sink further down away. Rod should remain upright to maintain the deployed depth and distance. Using cable car rig can be pretty tricky depending on the direction of cast and current you're deploying against. Take the diagram below as an example, in this setting the main line is anchored directly against the current flow. The result is the hook line will be unable to sink very deep because the current is oncoming current is preventing the bait fish from sliding down. In such cases, you'll be fishing very near to the surface. Fishes like needlefishes are most common at this level although you might sometimes encounter fishes like wolf herring and mackerels. While fishing against the current might seem most difficult, it is worth noting that most bait fish congregate at the head current infront of structures like the jetty. If successfully deployed, it offers best chance of getting a hit. When fishing against the current, you might want to use a heavier sinker or a grip sinker to counter the force of the current pushing back your main line. You may also add a sinker to the hook line to sink the bait a little more. How feasible it will be also depend a lot on current speed. You can only fish against the current when current is fairly slow.
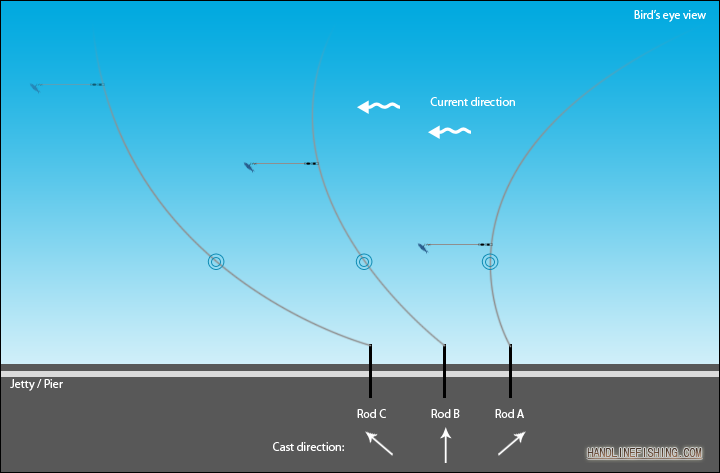
The scenario below shows current flowing away from the jetty, this is the easiest way to deploy a cable car rig. The current will aid the bait in slide downwards. The main line should not be too taut, leaving some curvature of the line underwater helps keep the bait fish off the sea bed. This scenario offers good chance to land pelagic fishes like queenfish, mackerels, wolf herring and barracudas.
The third example shows deploying the cable car rig when the current is flowing along the jetty. Note that the angle of cast determines how far and how deep your baitfish will ultimately be at. In most cases, you can only cast 90 degrees against the current or less if you want your bait to sink deep enough. (see rod B and C)
|
| General Info: News & Articles :: Lunar Tides :: Resource :: About Site |
| How to Fish: Basics & Concepts :: Types of Fishing :: Specific Guides :: Knots & Rigs |
| Where to Fish: Shores & Jetties :: Reservoirs & Streams :: Offshore Islands :: Pay Ponds |
| What's this Fish: Freshwater :: Marine :: Fish Facts :: Other Aquatic Life |
| Who's Fishing: Chat Room :: Tackles Directory :: Offshore Fishing :: Discussion Forums |